Joy Curators

daily inspirations, curiosities, and obsessions


Leave a comment

Real Life Still Life: A Free, Easy Way to Dress-up Your Home

This is a perfect activity for someone who owns stuff and wishes to display that stuff in an attractive way.

Is that you? Great! I thought so.

As you may know, a Still Life is a work of art that showcases inanimate objects in a grouping.

Here are a few examples in my home:

DSC_1755 DSC_1757 DSC_1758

Food and flowers are extremely common in Still Lifes (yes, that is the correct plural), so today we are going to keep it simple and utilize the food in your kitchen, and the plants in your (or your neighbor’s) garden.

Scour your refrigerator and pantry for fresh edibles.

Fruits such as apples, grapes, oranges, and bananas are lovely, but don’t overlook root vegetables such as onions, garlic, and potatoes, as they can provide contrast to an elaborately decorated plate or brightly colored flowers.

Don’t worry if you can’t find much variety, some of the best arrangements are made with only one type of food.

DSC_1760

Now you must locate an attractive dish or bowl.

The dish can be a part of your everyday plate-ware, a special serving dish, or an antique you bought to display.

I think the best Still Lifes involve medium size dishes/bowls, but it really depends on the size and quantity of the objects you plan to arrange. If you have three cherries, a shot glass would do the trick; however, if you have 15 watermelons, a clawfooted bathtub would be better suited.

If you don’t have any fresh fruit or veggies in your kitchen, have no fear! Pull a Warhol and arrange some cans!

DSC_1761

If you are having trouble making a balanced arrangement with your items, try limiting yourself to five objects. I find that this is the quickest way to achieve balance.

Top it off with a sprig of greenery like a cutting from a bush. Alternatively, pick a few flowers and tuck them into the arrangement.

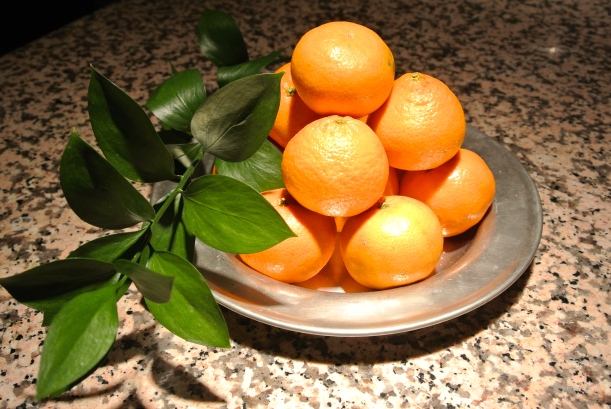
For my favorite arrangement, I built a mountain of cheerful, sweet-smelling clementines on top of an antique pewter dish and accessorized  it with a branch of greenery that brings life to the scene. I placed it on the kitchen peninsula so that it can be enjoyed from many angles.

DSC_1736DSC_1735DSC_1732

There you have it! A simple way to fill your home with living art!

Lilo and I are hoping to gain more followers, so if you enjoyed this post, please follow us. 🙂

Thanks,

Missy

Flake It ‘Til You Make It: A Cure for Snowy Sunday Stoicism

Leave a comment

rug flakesIf you’re stuck in the East Coast’s almost perpetual winter barrage like Lilo and I are, I’m sure the novelty of snow has well worn off.

Let me change that for you.

As we all know, outside snow is cold and wet; there is only so long you can make snowballs, igloos, snowmen, ice facials (stick your face in snow, pretend to be a Real Housewife who can’t feel her face anymore but looks sooo good!), and chocolate snow cones (add a little water to Hershey’s syrup, pour the mixture on top of a bowl of snow, eat it) until your hands turn blue.

. . . but what about INSIDE snow?

“What’s that?!” you say?

Well, children, don’t get too excited! It’s paper, not magic.

That’s right, let’s make snowflakes.

Snowflakes are for all ages, require few resources, and serve a decorative purpose. You can make them while binge watching Twin Peaks on Netflix. They make people happy. Get excited for snowflakes, dammit.

INSTRUCTIONS:

DSC_1742 DSC_1743 DSC_1744 DSC_1745 DSC_1746DSC_1747DSC_1748

First, find any piece of paper. The one I’m using in this picture is construction paper, but printer paper is always a classic. Sometimes I use linen paper if I want to be fancy, but it is truly up to you.

Find a pair of scissors that are sharp and easily manipulated. For this reason I would advise against using kitchen shears.

Now, we have to turn the rectangular piece of paper into a square.

To do this, first take the lower left corner and pull it diagonally to make the left edge and the top edge flesh.

Once they match, crease the paper to hold the fold.

Now, cut the remaining rectangle off.

The remaining paper is now square shaped, but leave it folded into a triangle.

.

.

.

Fold the right corner of the triangle to the center point.

.

.

.

Do this again to the left side, bringing the left point to center.

This creates a diamond shape.

.

.

Fold this diamond shape in half, using the line in which the previously folded sides meet as your axis.

.

.

.

This is a top view of the final result.

From here, cut as your heart desires! Just do not slice either of the folded sides off completely, as they hold your snowflake together.


I like to take inspiration from the patterns on Nordic sweaters, plants, Native American tribal patterns, and architecture. Lately, I have been deeply inspired by the work of British interior decorator David Hicks and his geometric patterns. (I will certainly do a post on him on the future.)

DSC_1749

You could find inspiration from Gothic architectural features such as rose windows, pointed arches, and the quatrefoil shape. 

Or just snip away randomly! You do you!

If you don’t have a pair of scissors handy, or just don’t want to clean up the resulting confetti byproduct, there’s an app for that. I recommend Paper Snow 2.

Happy snow day,

Missy


Leave a comment

Every Rose Has Its Thorns: A Handy Guide To Not Getting Pricked

Flowers usually serve as an instant pick-me-up for me, so it’s weird that receiving these long stem roses would make me feel melancholy.

Let’s be honest, I may have 99 problems, but flowers on my doorstep ain’t even one. Would roses from any other suitor smell as sweet? Rationally, no.

Did I just follow a Jay-Z reference with a Shakespeare one? Ain’t nothing but a G thang.

I need to stop.

DSC_1726

With Valentine’s Day coming up, I’m sure you won’t need an excuse to pick up some roses either for your honeybunny or yourself.

A few things you should keep in mind when buying roses:

  1. Examine the edges of the petals to make sure they aren’t browning– a sign that these flowers might have been bruised in transit.

  2. Lightly squeeze the thick part of the flower between your thumb and index finger. The flower should feel hard, meaning that the petals are still tightly closed. Flowers that are too loose will not live as long.

  3. Keep heat away from the roses. This includes body heat from your hands or breath. Heat will cause the flowers to open, and therefore die sooner.

  4. If you are gifting these flowers to a host or hostess of a dinner party, it is rude to arrive with them sans vase. The host should not have to interrupt their activities to tend to your gift.

  5. When arranging roses in a vase, be sure to lightly grasp them to avoid sicking yourself with thorns. Cut each stem diagonally, about an inch from its end, and immediately place the flower in cold water.

Until next time,

M